|
|
|
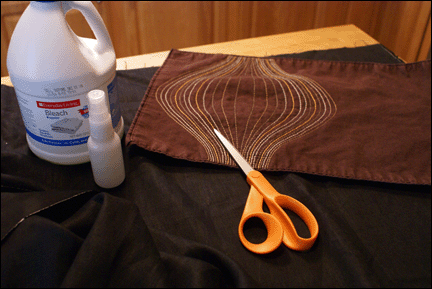
Project: Bleach Stencil Placemats
|
|
I've been meaning to attempt bleach stenciling for a while now and frankly, I don't know what took me so long. It's quick and easy and kind of fun, if not a little smelly. Usually bleach stenciling involves a flat stencil, but for this project I wanted to use objects as my stencil. For my first attempt, I made placemats with a ghostly place setting. Or maybe it's like the memory of a place setting. Hmm...
What you'll need:
- plain ole bleach
- a spray bottle
- black or dark-colored fabric (I used black linen)
- a bowl of water
- scissors for cutting fabric (duh)
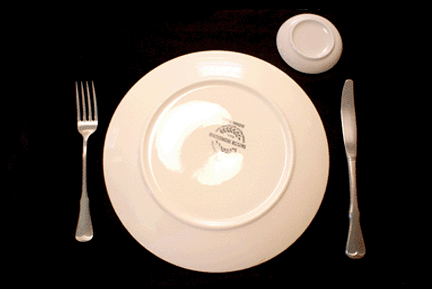
- dinner plate, knife, fork, and small 3" approx. circle of something that is water resistant
Step 1: Mix your water/bleach solution in your spray bottle- 1/2 bleach to 1/2 water. Fill a large bowl with water and keep it close to your work area. After you bleach your fabric, you'll plunge the piece into the water to stop the bleaching process. Make sure to protect yourself and your working area. Cover yourself (or do it naked, I don't care) and make sure to place plastic on any part of your work area that you don't want covered in bleach- it gets messy, I'm telling you! Also keep plenty of towels or rags nearby for cleaning up.
|
Step 2: Make a series of tests with scraps of your fabric to figure out how long you'll need to leave the bleach on and to find out if your spray bottle will give you the results you want. I tried two different spray bottles- a small atomizer/spritzer and a larger spray bottle. While the spray bottle was okay, I preferred the look of the fine mist the spritzer gave me.
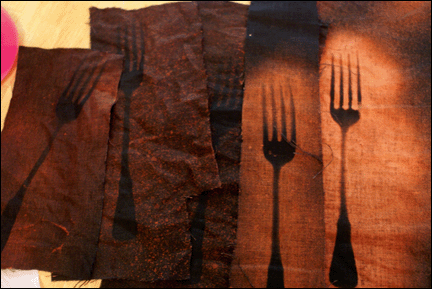
The longer you leave the bleach on, the brighter your bleached areas will be. Don't make any decisions about how long to leave the bleach on until after the fabric has dried. It'll look much lighter dry than when it's wet. This test will also give you a better idea of what color the bleached areas will be. Mine came out a nice, rusty orange, some bleached fabric can be more of a cream color or even white.
Step 3: To make placemats, cut your fabric to a little larger than placemat-size (I suggest 11 x 18, plus 1" on top and bottom for a 1/2" selvage) and hem your placemats, making sure they're all a uniform size.
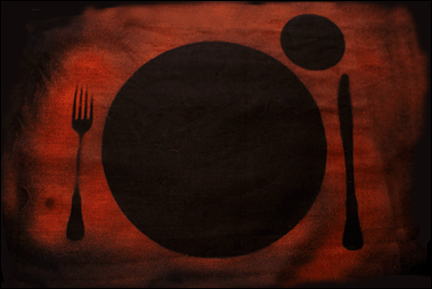
Step 4: When you're ready to bleach, arrange your plate, knife, fork and small circle (I used a saucer from my daughter's tea set- Shhh! Don't tell!) on the placemat exactly as you'd set your table. The small circle represents the glass. To make a sharp edge around the plate, turn it upside down so that the bleach doesn't spray under the edge of the plate. It might spray a little under the fork, but if you "roll" the tines of the fork as you spray, it shouldn't happen too much.
Step 5: Now go ahead and spray! Make sure you get it everywhere it needs to be. Remove the plate and silverware immediately so that you can keep an eye on the bleaching process and get ready to plunge the fabric into the water bath as soon as you think it's done. After you swish it around in the water for a bit, wring out the excess water, lay it out to dry and continue with the rest of your placemats until your set is complete. Just to be on the safe side, make a couple of extra ones in case a few turn out not so perfect. Or not. Whatever.
They remind me of the process of making photograms in the darkroom, which I miss now that I don't have access to one anymore. The black and orange combination also makes me think of Halloween and if you know me, that's not a bad thing. I could have taken it one spooky step further and have a faint hint of a ghostly face in the center of the plate area.
|
|
|
|
|
|
Poopscape is written by Claire Chauvin, a craft-obsessed mother and photography teacher living in Houston, Texas. If you have a question or a compliment, have tried one of my projects and want to share with me, or just want to chat, please email me at claireATpoopscape.com.
|